

- Create a traditional 3-strand braid by dividing your hair into 3 sections and crossing the outer sections up and over the middle section in an alternating pattern.
- Make a French braid by following the same pattern as a traditional braid but incorporating extra pieces of hair as you go.
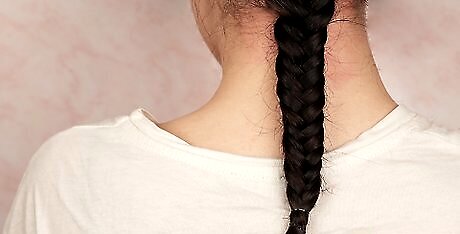
- To do a fishtail braid, divide your hair into 2 sections and bring one strand of hair over one section and into the other.
Classic 3-Strand Braid

Brush your hair so it’s free of knots. Before you start braiding, you want to make sure there are no tangles in your hair. Run a brush or a comb (whichever works best for you) through your hair until it’s smooth, starting at the ends of your hair and working your way up to the roots. Use a detangling spray to help brush out stubborn knots.

Part your hair depending on how you want your braid to fall. The beauty of the classic 3-strand braid is that it’s versatile. You can have a side braid, braid that falls down your back, or pigtail braids on either side of your head—the possibilities are endless! Opt for a side part for a side braid, gathering the most hair on the side where the braid will fall. Stick with a middle or side part for a braid that falls along your back. Do a middle part for pigtail braids, so each braid is even.

Divide your hair into 3 sections. Gather all of your hair into your hands. Then, run your fingers through it to create 3 even sections. We’ll call these Section A, Section B, and Section C. Look in the mirror as you do this to ensure that your sections are even.

Cross Section A over Section B. To start braiding, bring Section A over Section B with your right hand, so Section A moves to the middle. Use your left forefinger and middle finger to hold Section A in place. If starting with your left hand doesn’t work, no worries! Start with whichever hand and hold works for you.

Bring Section C over Section A. Now, guide Section C over Section A with your left hand, pulling it in place with your right forefinger and middle finger. Pull Section C tight. Use your right thumb to move sections in and out of the middle as you work.

Move Section B over Section C. Bring Section B over Section C with your right hand, so Section B moves to the middle. Use your left middle and forefinger to hold Section B in place.

Follow this weaving pattern until you reach the end of your hair. Continue pulling Section A over Section B, Section C over Section A, and Section B over Section C. Pull the outside sections tight after each move to keep the braid in place. Find whatever hold works best for you. There’s no right or wrong way to braid as long as you stick to the pattern.

Secure your braid with a hair elastic. Once you reach the ends of your hair, hold the end of your braid tightly with one hand. Use your other hand to carefully wrap a hair elastic or tie around the end, just as you would when making a ponytail.
French Braid

Brush your hair back until it’s nice and smooth. Braiding is much easier when there aren’t any knots in the way, so make sure your hair is tangle-free before you begin. Swoop your hair back and away from your face with the brush to get it in position for a single French braid. If your hair is extra fine, try spritzing it with dry shampoo, as this gives your hair more texture and makes it easier to braid. Making French braid pigtails is another way to do this classic hairstyle, but for the sake of this beginner’s tutorial, we’ll be taking you through the process of a single French braid.

Create a section of hair at the front of your scalp along the top of your head. Unlike a traditional 3-strand braid, a French braid starts on your scalp rather than at the base of your neck. Use your fingers or a comb to section off a small area of hair on top of your head, as if you were creating a half-up top knot. Use your temples as a guide when creating your section, dragging your fingers or comb from the end of your eyebrows to the top of your head.

Divide the section of hair into 3 more sections. Similarly to a 3-strand braid, a French braid requires 3 sections of hair. Use your fingers to form 3 even sections. We’ll call these Section A, Section B, and Section C. It can be helpful to hold 2 sections of hair in your left hand and 1 in your right. Hold the sections firmly, keeping them separated by an index finger.

Cross Section C over Section B. Take the section on the left and pull it over the middle section and under the section on the right, as if you were doing a traditional 3-strand braid. Secure Section C with your left index and forefinger, and grab Section B with your right hand. If you get stuck, remember that the middle piece always goes over when making a French braid. Alternatively, you can make a Dutch braid by bringing the middle piece down and under when weaving. If starting with the left-most section doesn’t work for you, no problem! Start with whatever section feels the most natural.

Pull Section A over Section C while adding hair to Section A. Use your left hand to scoop a small section of hair from the outside of your braid and add it to Section A. Cross this thicker section over Section C so it’s in the middle. Adding hair as you braid is what makes a French braid different than a classic 3-strand braid.

Add hair to Section B and cross over Section A. Repeat the same process of adding hair and moving it over into the middle of the sections with Section B. Try to add the same amount of hair you did before to help keep your braid even.

Continue braiding until you reach the base of your head. Alternate from left to right, adding hair to each outer section before moving it into the middle. Keep going until you’ve run out of hair to add to your braid.

Use a 3-strand braid to finish your French braid. Follow the same pattern as before, but skip adding new hair to each section. Keep braiding up and over until you reach the ends of your hair. Secure the braid with a hair elastic, and you’re good to go.
Fishtail Braid

Brush your hair until it’s free of tangles. Like any other braid, it’s important to make sure your hair is nice and smooth before you begin braiding. The fewer knots there are, the easier braiding will be. Use a detangling product before you brush if you have stubborn knots or your hair tangles easily.

Part your hair into 2 even sections. Use a hair pick or comb to divide your hair down the middle to create 2 sections of hair (one on either side of your neck). Hold the right section of hair with your right hand and the left section with your left. Unlike other braids, the fishtail braid uses 2 sections rather than 3. We’ll be teaching you how to do a fishtail braid that falls down your back in this tutorial, but you can easily pull your hair to one side and section it from there to create a side-swept fishtail.

Pull a section of hair from the left section over to the right. With your left fingers, grab a small section of hair (about ⁄2 inch (1.3 cm) thick) from the outer side of the left section. Guide this strand of hair over the left section and into the right section. Keep the added strand towards the middle of your head, so you don’t accidentally add it back into the braid. Practice this braided hairstyle in the mirror, so you can see what you’re doing.

Cross a section of hair from the right over to the left. Take your right hand and grab a ⁄2 inch (1.3 cm) thick section of hair from the outside of the right section. Pull this small section up and over the right section and into the left, just as you did with the left section.

Continue this alternating crossing pattern until you reach the end of your hair. Grab hair from the left and pull it over to the right, and then grab hair from the right and pull it over to the left. Keep doing this until there’s no more hair to braid. As you braid, your 2 sections of hair will get smaller and smaller, so it’s okay to cross the same strand of hair over more than once.
Tie your hair off with an elastic. Once your braid is formed, secure it with a hair tie. Now all that’s left to do is rock your hair-do and show off your amazing braiding skills! For a tousled and more voluminous look, gently pull on the outside strands of the braid to make it wider.
Rope Braid

Slick back your hair with a brush or comb. As with any braid, it’s important that your hair is knot-free before you start braiding. Brush your hair over to one side for a braid that’ll fall over your shoulders, or comb your hair back for a braid that’ll fall down your neck. If this is your first time trying this hair style, we recommend going for an over-the-shoulder braid, as this will make it easier for you to practice and see what you’re doing in a mirror.

Split your hair into 2 even sections. Rope braids are perfect for beginners because they only require 2 sections of hair and no weaving. So, to get started, divide your hair into 2 equal parts, holding the left section with your left hand and the right section with your right.

Twist the 2 sections of hair to the right. Use your fingers to twirl your hair into tight “ropes.” Try to keep the twists as tight as possible.

Cross the right section over the left strand. Always cross the sections in the opposite way of their twist. Since you twisted the hair to the right, you’ll pull the sections over each other from the left.

Wrap the sections around each other until you reach the end of your hair. Continue crossing the left-hand section over the right. Twist the sections to the right as you wrap if they start coming loose. When you reach the end of your braid, tie it off with an elastic.


Comments
0 comment