
Drawing a Single Banana
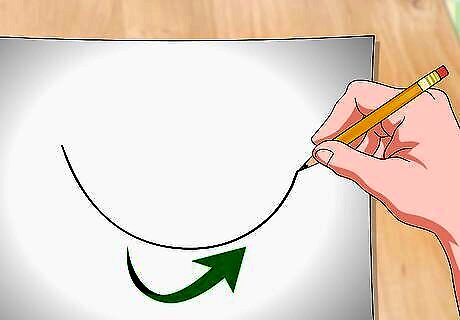
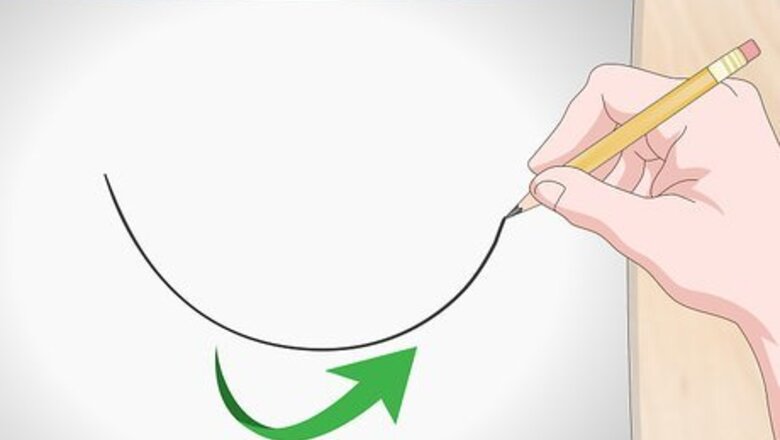
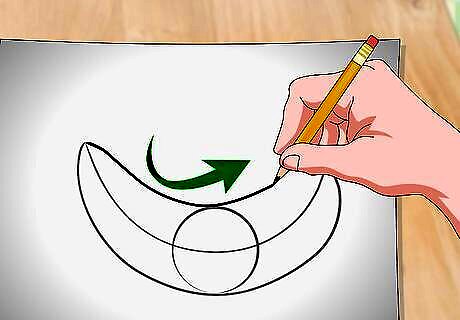
Draw a horizontal curve that’s going upward. Think of it as drawing a smile. This curve will determine the length and shape of your banana. Use a pencil for your drawing since you’ll be adding some guiding lines and circles you’ll have to erase later. Tip: It may be easier to draw your banana horizontally with the paper longways. Then, if you want a vertical banana, you can just rotate the page!
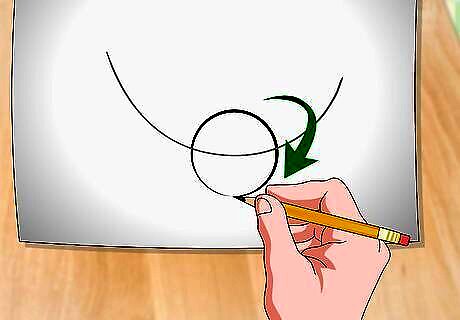
Draw a small circle over the center of the curve. Make the circle the width that you want your banana to be. It doesn’t have to be a perfect circle, but try to have it as centered on the line as you can.
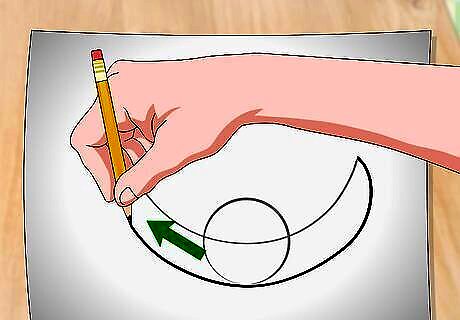
Make a second curve below the first one. Have the second curve fall along the bottom edge of the circle you drew. It should curve upward, just like the first one, and the ends should meet up with the ends of the first curve. This will be the bottom of your banana. Tip: Slightly curve the very ends of the lines where they meet so you don’t end up with a sharp, pointy banana!
Draw a third curve above the first curve. This curve should fall on the top edge of the circle you drew. Make it so the points meet up with the ends of the other 2 curves. This will be the top of your banana.
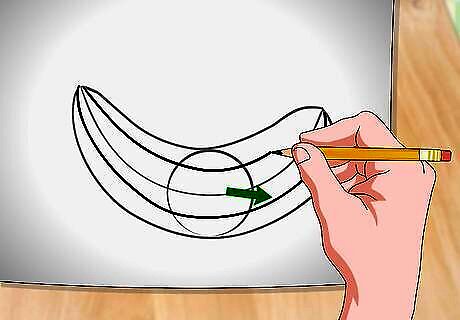
Sketch 2 more curves that run between the first 3 curves. The ends of these curves should meet up with the ends of the other curves. At this point, your banana should be made up of 6 horizontal curves. These extra lines give shape to the banana’s peel, which is not perfectly circular all the way around (like the actual fruit inside). If you want to make a cartoon banana, leave out these extra 2 lines. Instead, draw a pair of cartoon-y eyes with a big smile underneath. You can put the face anywhere you like and give it whatever expression you want; it’s your drawing, after all!
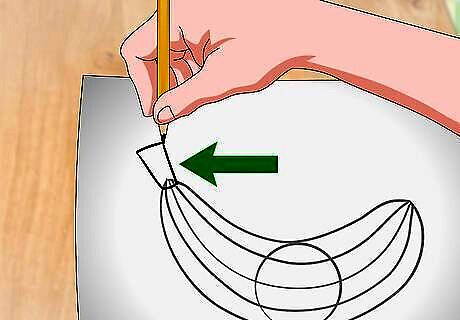
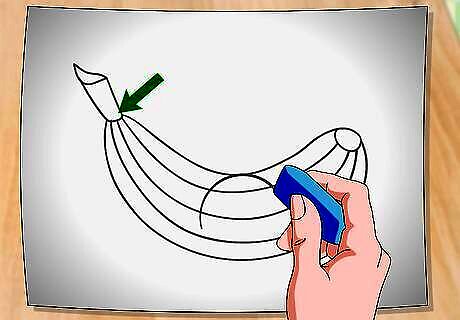
Draw a thin rectangle at one end of the banana to make the stem. When you’re drawing the rectangle, make it slightly thinner at the end that overlaps with the banana. Picture a real banana for this part. The very end of the stem is thicker because that’s where the other bananas in the bunch come together.

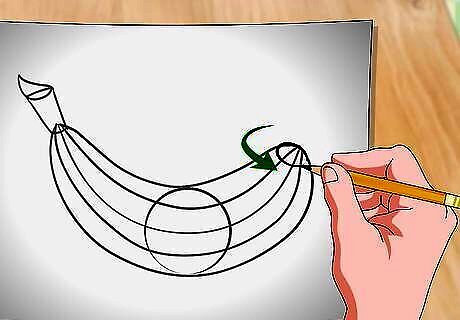
Add a three-dimensional point to the end of the stem. This point makes the stem seem more realistic. Draw a three-dimensional point with a flat edge so the banana looks like it was pulled from a bunch.
Draw an oval on the end of the banana that’s opposite the stem. This oval will be the round tip at the end of the banana.
Erase the guide circle you drew earlier. Erase any excess lines to clean up your drawing before you ink or color it. Get rid of the lines inside of the stem and the oval at the end of the banana, too.

Color in the banana. A little color will help finish your drawing! Color the tips of the banana brown and fill in the spaces between the curves with different shades of yellow and green. Once you’ve finished coloring in the banana, your drawing is complete! To add some dimension to your banana, try coloring the bottom parts with a dark yellow and the top with a lighter yellow. This will give it some shading and make it look like there’s a light shining on your banana. Tip: If you want the outline of your banana to be clearer, go over your drawing with ink.
Drawing a Bunch of Bananas
Draw a small rectangle with rounded corners in the upper right corner of the page. This rectangle forms the top of the stem where the bananas all join together. The longer the rectangle, the more bananas you can fit in your bunch! Tip: To add some depth, draw a curved line inside the right end of the rectangle to form a circular “cap” (if it were 3D, this would be the side “closest” to you). Lay your paper landscape-style (longways). If you draw the rectangle in the upper right corner, your bananas will curve out to the left (and vice versa). If this is your first attempt at a banana bunch, draw in pencil so you can erase mistakes and experiment with new lines and shapes.
Draw the bottom curve of your primary banana. In this drawing, your primary banana is the one closest to the viewer where you can see the entire outline (the others will be partially hidden behind). Draw a long, curved line (like a “swoop”) coming down from the right end of the rectangle.
Draw a second curved line to form the top of your primary banana. Start this line back at your rectangle, just a little bit away from your first line. Stay close to your first line to start to outline the skinny banana stem, then widen the distance between the lines to form the thicker shape of the banana. Curve the very end of this line in toward the bottom curve without fully connecting them.
Draw a small circle at the end of the banana to connect the two curves. This represents the flat “point” of the banana and helps you avoid making an unrealistically sharp tip.
Sketch a long, curved line inside the banana to add dimension. Start your line close to your small circle (without connecting to it) and continue upward, following the shape of the banana. End the line a bit before you hit the stem so that the line stretches through most (but not all) of the banana. After this step, your primary banana is finished!
Outline a second banana behind the first one. Go back to your rectangle and draw a long, curved line coming down from it to form the top curve of your next banana. Start a bit to the left of your first banana and stay close at first to make the thin stem, then widen your curve so the line extends above and a little bit farther out than the tip of your first banana. Then, draw a shorter curved line to outline the bottom of the second banana. This line will connect the tip of the second banana to the top curve of the first banana, a little bit behind the tip (this makes the second banana look like it’s partially “hidden” behind the first). Finish your second banana with a small circle at the tip, just like your first one.
Draw a curved line inside your second banana to add dimension. Just like with your first banana, draw this line inside without fully connecting to the tip or the stem. Follow the shape of your new banana; it may be a slightly different size or at an angle compared to the first one. This is good, since it makes the bunch look more realistic!
Outline a third banana behind the second banana. To make your bunch look full, draw more curved lines from the rectangle to shape your final banana, just like you did for the last one. Have the top curve of your third banana hug the top curve of the second banana a bit closer compared to how the second banana branched off from the first. This gives the illusion of the third banana being farther back in the bunch. This also means the bottom curve connecting the tip of your third banana to the top curve of your second banana will be fairly short. Just like with your first two bananas, add a curved line along the peel for dimension and a small circle at the tip. After this last banana is complete, the outline of your bunch is done!
Ink and color your drawing. Go over your pencil lines with an ink marker for artists (or any kind of dark ink pen or marker you have around). Then, add brown to the ends of each banana and to the rectangular stem. Color in your bananas yellow to complete the look! To add some shading, color the lower portion of each banana dark yellow and use a lighter yellow on top. Or, if you prefer to shade your sketch with pencil, lightly color in the bottom side of each banana with pencil, then use a smudger tool to blend out the graphite into a smooth shadow.


Comments
0 comment