
- Brush and part your hair before you start braiding so it's smooth and ready to be styled.
- Start the waterfall braid like you would a regular braid, weaving 3 strands of hair together.
- Create the waterfall effect by adding a portion of hair to the far left strand and letting go of the right strand.
Prepping Your Hair
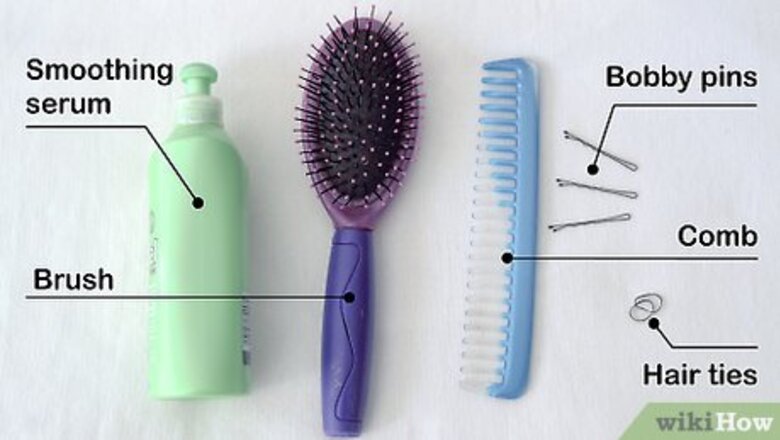
Gather your materials. You won't have many materials for braiding your hair, perhaps only a brush, some small hair ties, and maybe a few bobby pins. However, it's helpful to have all of these things near you and ready to go as you braid, so you can secure your hair as soon as you're finished braiding. Often, someone will start a braid only to realize they don't have a tie or pin to secure it, and then they risk messing up their hair when they have to search for something to hold their braid. Consider keeping a hair tie on your wrist as you braid. That way, securing your braid when you're finished simply requires you to slip the tie off your wrist, rather than changing hands to pick up the hair tie and possibly letting go of the end of your braid.
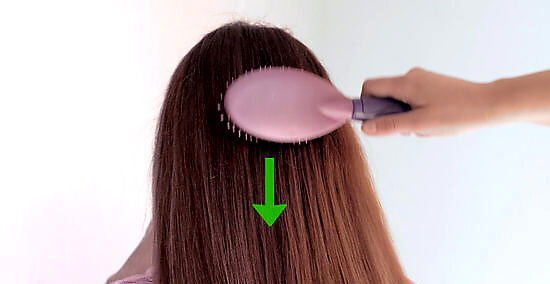
Brush your hair. Brush your hair with a natural bristle hairbrush if your hair is dry, or with a wide-tooth comb if your hair is wet. You want to remove any knots or tangles so your hair is easier to manage while braiding. Pay special attention to remove knots from the ends of your hair. When you're braiding and collecting sections of hair, separating the sections can be more difficult if the ends are knotted together. Spritz your hair with a detangling spray to help it stay smooth.
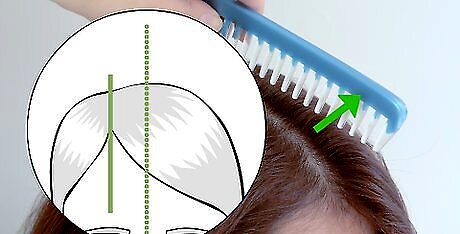
Consider creating a side part. A waterfall braid with a side part helps add to the cascading waterfall appearance of your braid. By parting your hair in a deep side part, and flipping the parted hair over to the other side of your head, your hair is essentially taking on the nature of a waterfall. You can still braid a cascading waterfall braid on hair that is parted down the middle, however a deep side part adds a nice touch to the braid and enhances the cascading waterfall look by having your own hair "cascade" on the other side of your head.
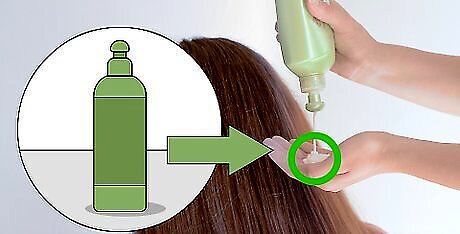
Consider applying a smoothing serum or leave in conditioner. If you aren't going for a stylish messy look, a smoothing serum or leave in conditioner can help keep your hair smooth and manageable while braiding. Damp hair can easily tangle, but leave in conditioner can smooth it so that it's easier to manage. If your hair is fine, has small, flyaway hairs, or is more than one length, consider applying a styling cream or smoothing serum. A smoothing serum can help tame unruly hairs, and keep stray, flyaway hairs from coming loose within the braid.
Braiding
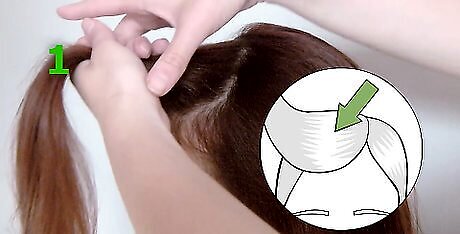
Separate your hair into your first section. Your first section of hair should be near your forehead, around the area of your bangs. Usually waterfall braids start out with a section that is about an inch in length, but this section can vary in size depending on how thick you want your braid to start out. The bigger the first section, the thicker the beginning of your braid will look. If you parted your hair with a deep side part, start your braid on the side of your head with the most hair.
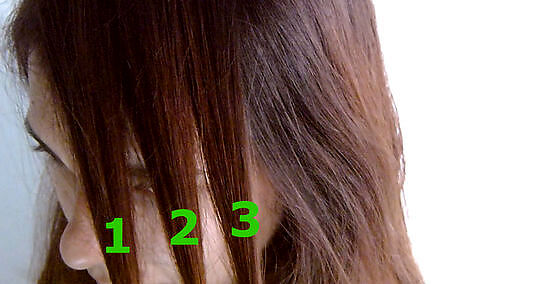
Separate your first section of hair into 3 equal parts. You can do this by running 2 fingers through the section of hair to make 3 same sized pieces of hair. Hand positioning is important when braiding hair. Usually the most successful way to hold hair as you braid, is to hold 2 portions of hair in 1 hand, and the third portion of hair in the other hand. Usually the fingers stay in a curled, tight position to hold the strands of hair as you move them to form the braid.
Complete 1 braid sequence. Start by using the 3 strand braiding technique to braid this first section of hair. The 3 strand braiding technique is the method used to make any traditional 3-strand braid, which is also known as a box braid: Start by crossing the left portion of hair over the middle portion, and then cross the right portion of hair over the new middle portion (which was the original left portion of hair). Once this sequence is complete, you will begin to add more hair into the braid outside of the three original portions of hair you started with. This process of adding hair to the braid outside of the original three portions of hair is a key component of creating a french braid. The waterfall braid starts out with a typical three strand braid, but then continues on as an altered french braid.
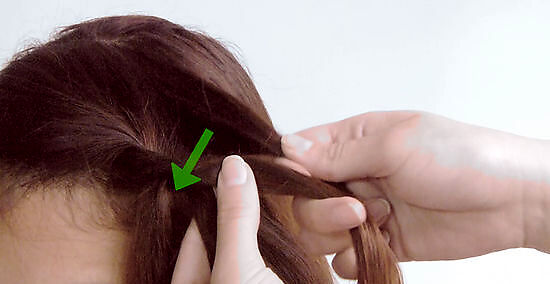
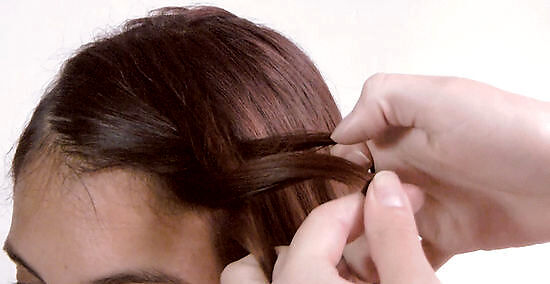
Begin incorporating more hair into the braid. Once you have completed your first braiding sequence, add another portion of hair into the braid by collecting hair from the top of your head, next to the left portion of hair currently in your hand. Once the left portion of hair is combined with the new, additional left portion of hair, continue braiding: Cross the left portion of hair (now thicker with the new portion of hair added in) over the middle portion. Now, instead of crossing the right portion of hair over the middle portion like you would normally do to create a braid, let go of the right portion of hair so it hangs and drops down normally. This is where the waterfall effect comes into play. The dropped, right portion of hair is your first "waterfall" piece of hair. This will create a cascade waterfall braid on the right side of your head. For the left side, you'd reverse the instructions.
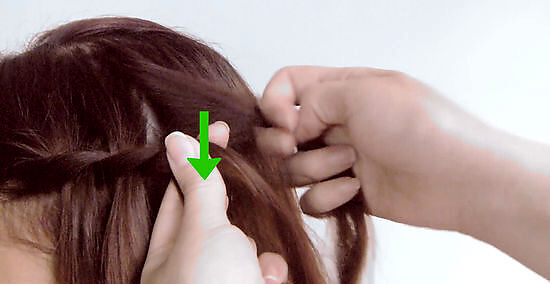
Continue braiding by incorporating new hair. From here on out, you will be using a french braid technique to add hair to the braid from both the top and bottom areas of the braid: Once you have dropped the right portion of hair, get your next “right” portion by taking a portion of hair from the roots right behind the dropped piece. Grab a piece of hair approximately the same size as the hair portions you are already using in the braid. Cross this new “right” portion of hair over the middle portion of hair, like you would in using the normal three strand braiding technique. Then, add more hair into the current “left” portion of hair. Do this by sectioning a piece of hair from the top your head, and combine that new portion of hair with your current left portion of hair. This is exactly the same process as when you first started adding new portions of hair to the braid. Cross this entire left portion of hair over the middle section of hair, and again, let the right portion of hair drop. Since this braid is executed horizontally on your head rather than vertically (like a French braid down the middle of the back of your head), the dropped right portion of hair horizontally across your head gives the illusion of a waterfall. Maintain tight, even tension on your hair as you braid it. Pull your hair back toward your crown to help create a smooth style. If your braid is too loose or you pull away from your scalp, you'll likely end up with lumps in your finished braid. If you're braiding your hair on the left hand side, don't forget to reverse the instructions.

Finish the braid. Once you have braided around your head to about your ear (or until you want your braid to end), finish your braiding by no longer adding and dropping hair, but braiding the three portions of hair like a normal crossover braid. You can either secure the bottom of the braid with a small elastic band, or with a bobby pin or clip. Consider spraying your braid with a small amount of hairspray to keep strands in place.


Comments
0 comment