

Check if Windows is up to date.
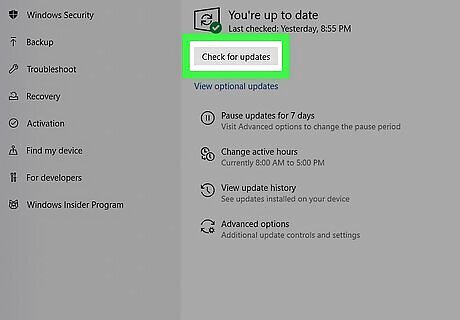
Keep your computer updated to the latest version of Windows. With each new version update, Windows keeps your device running smoothly and securely. To make sure you’re running the latest version: Windows 10: Select the Start button, then go to “Settings” > “Update & Security” > “Windows Update.” Windows 11: Select the Start button, then go to “Settings” > “Windows Update.”
Disable Windows notifications.

Turn off your notifications while you’re gaming. Turning off your notifications can prevent your computer from pulling you out of the game. Here’s how to disable Windows notifications: Windows 10: Press the Start button, go to “Settings” > “System.” Click on “Focus Assist” or type “focus assist” in the search box in the Settings taskbar and select “Focus assist settings” from the results. Select “Alarms Only” to turn off all notifications. Windows 11: Press the Start button, go to “Settings” > “System” > “Notifications.” Turn on “Do not disturb” by selecting “On.”
Turn on Game Mode.

Prioritize your gaming experience by turning on Game Mode. Windows 10 and 11 come with a Game Mode that turns off unwanted programs in the background, prevents Windows Update from performing driver installations and sending restart notifications, and helps create a more stable frame rate for your video games. To turn on Game Mode: Press the Start button and type “Settings” in the search box, then select “Settings.” Select “Gaming.” then “Game Mode.” Click the switch to turn Game Mode on.
Adjust your computer’s visual effects.
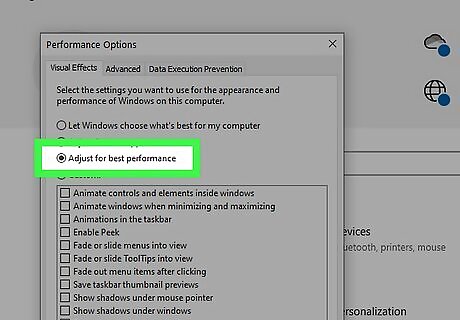
Turn your graphics down to boost your PC’s performance. Even though it may impact the way your visuals look, reducing your graphics can make your system run smoothly and improve gaming performance. Here are some tips to adjust your settings for the best performance: Select the Start button, then type in and open “Settings.” Type “performance” into the Settings search bar, then select “Adjust the appearance and performance of Windows.” In the pop-up box, select “Adjust for best performance.” If you have multiple screens, only have one turned on while you’re gaming.
Turn on Hardware-accelerated GPU scheduling.
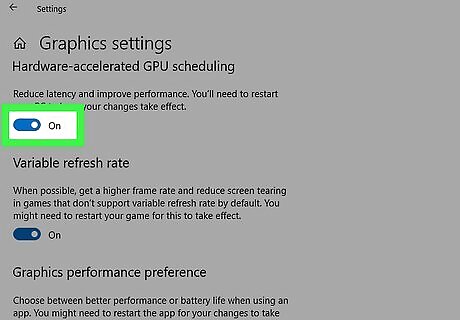
Enable hardware-accelerated scheduling in your device settings. Hardware-accelerated GPU scheduling allows your computer to optimize your gaming performance and prevent network latency. You can easily turn it on or off if your computer is running Windows 10 or 11. To turn it on: Press the Start button, search “Settings” and hit Enter. Select “Display” from the “System” page, then click on “Graphics.” Click on “Change default graphics settings” at the top of the page. Click the toggle under “Hardware-accelerated GPU scheduling” so that it says “On.” If the setting wasn’t on already, restart your computer.
Turn off enhanced pointer precision.

Disabling enhanced pointer precision can make your games faster. Having enhanced pointer precision enabled makes your cursor move faster when you’re moving your mouse quickly, but when gaming it can throw off your accuracy. To turn it off: Open the Control Panel and search “Mouse” in the upper-right search bar. Click on “Change Mouse Settings” and select the “Pointer Options” tab. Under “Motion,” click the check box next to “Enhance pointer precision.” Click “Ok,” and pointer precision should be turned off.
Uninstall old programs.
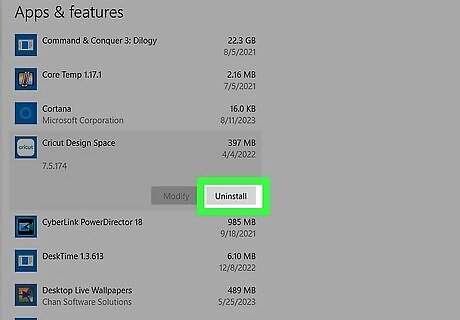
Remove unused apps and programs from your device. By deleting unnecessary programs, you can easily improve the efficiency of your device and improve your gaming experience. Look up the file you’re about to delete first—some applications are necessary to run games. To uninstall old programs from your PC: From the Start menu (Windows 11): Select Start > “All Apps,” then right-click the app you don’t need and hit “Uninstall.” From the Start menu (Windows 10): Select Start, then right-click the app you don’t need and hit “Uninstall.” From the Control Panel (Windows 10/11): Search “control panel” in the taskbar and hit Enter. Select “Programs” > ”Programs and Features.” Right-click the program you want to remove and select “Uninstall.”
Disable in-game overlays.
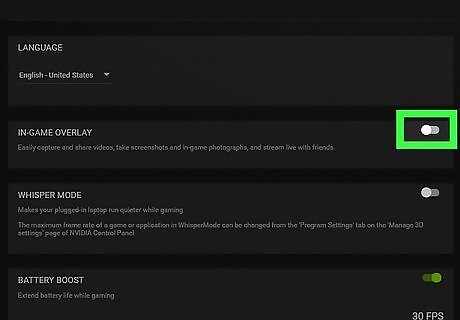
If you have gaming overlays, turning them off can help with lagging. Overlays can be used to screen record, capture screenshots, share gameplay with friends, and more. However, they can also eat up your bandwidth and cause performance issues while you’re gaming. Here’s how to turn off some of the most common overlays: Nvidia GeForce Experience: On desktop, click on the carrot in the bottom right corner to reveal hidden icons. Right-click on the “Nvidia” icon and select “Nvidia GeForce Experience.” In the app, click on the gear icon, scroll to “In-Game Overlay,” and click on the green toggle to disable. AMD Radeon ReLive: On desktop, click on the carrot in the bottom right corner to reveal hidden icons. Double-click on the Radeon icon, then select “ReLive.” Under “Global,” toggle “ReLive” to off. Xbox Game DVR: Click on the Start button. Select “Settings” > “Gaming.” In the Game bar, turn “Record game clips, screenshots, and broadcast using Game Bar” to “Off.” Discord: On desktop, click on the carrot in the bottom right corner to reveal hidden icons. Double-click the Discord icon, click on the Settings icon, select “Overlay” from the navigation bar, and switch “Enable in-game overlay” to off. Twitch: On desktop, click on the carrot in the bottom right corner to reveal hidden icons. Double-click the Twitch icon. Click the drop-down arrow in the top right and select “Settings.” Select the “In-Game” tab, and toggle “In-Game Overlay” to off so that the slider is gray. Steam: Open the Steam app, and click “Steam” > “Settings” > “In-game.” Toggle “Enable the Steam Overlay while in-game” so that the slider is gray. EA: Open the Origin app. Click on the hamburger menu in the upper left corner, then select “Settings.” Go to “Application,” then scroll until you see “In-game overlay.” Next to “Enable in-game overlay,” toggle the slider so that it’s gray.
Adjust Windows start-up settings.
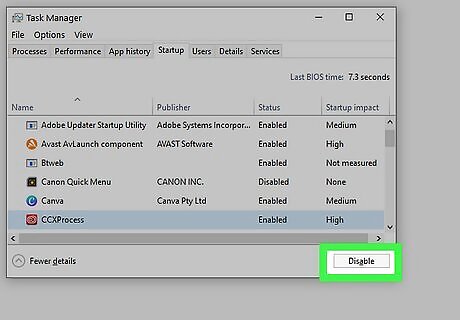
Disable applications that startup automatically. Some apps use your processing power to start up when you open your computer, which can slow down your PC while you’re gaming. Disabling programs you don’t need open can make a huge difference in performance. Here’s how to disable apps that may be processing in the background: Press Ctrl+Shift+Esc to open the Task Manager. Select the “Startup apps” tab. On any apps you don’t use regularly, right-click and select “Disable.”
Optimize your power settings.

Set your power mode to a higher performance setting. You can maximize your gaming experience by giving your PC the power it needs to increase your frames-per-second (FPS). Doing this can shorten your computer’s battery life if it isn’t plugged in, however, if you are using an external power supply, your PC will be fine. Here’s how you can change the power mode: Select the Start button, then go to “Settings” > “System” > “Power & Battery.” Under “Power” next to “Power Mode,” select “Best performance” from the drop-down menu.
Change your monitor refresh rate.
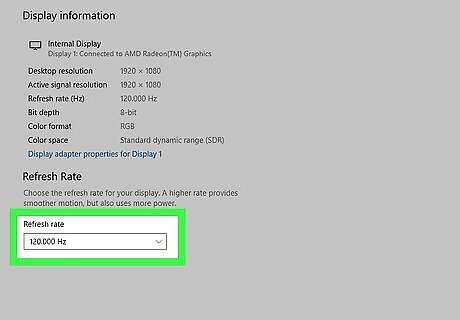
Boosting your refresh rate can make your game look faster. The refresh rate is the number of times per second that the image refreshes on screen. If you’re playing a game with a lot of fast-moving action, a higher refresh rate can help improve your gaming experience. To change your refresh rate: Windows 10: Select the Start button, then click on “Settings” > “System” > “Display” > “Advanced display settings.” Under “Refresh rate,” select the rate you want. The refresh rates that you can select from in your settings depend on your display and what it supports. Windows 11: Select the Start button, click “Settings” > “System” > “Display” > “Advanced display.” Next to “Choose a refresh rate,” select the rate you want. The refresh rates that you can select from in your settings depend on your display and what it supports.
Clean out your Temp folder.

Delete temporary local files on your computer. Another way to prevent your system from slowing down while you’re in the middle of gaming is to delete any temporary files on your device that may be running in the background. To clean out your Temp folder: To find the Temp folder, press the Windows key+R to open the Run command, then type “%temp%” in the search box and press “Ok.” You can also find the Temp folder by searching “%appdata%” in the desktop search bar. Hit the Enter key. Click “View” > “Show” > “Hidden items.” Click “AppData” in the menu location bar, and click the grayed-out “Local” file. Scroll until you find the grayed-out “Temp” folder. Once in the Temp folder, use Ctrl-A or click and drag to select all the files, then right-click and select “Delete.”
Repair system files.
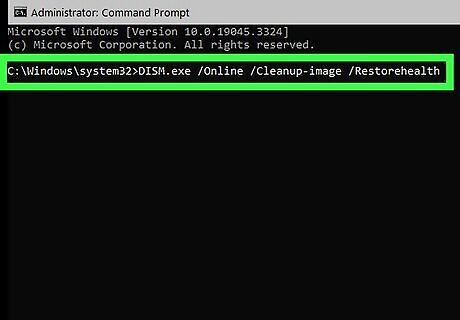
Corrupted system files can make your game crash or lag. To repair your system’s files, use Window’s built-in System File Checker tool. To scan and restore corrupted files: Select the Start button, search “Command Prompt” in the search bar, then select “Run as administrator” from the menu on the right. Click “Yes” on the pop-up if it appears. Type the following command, then press Enter: “DISM.exe /Online /Cleanup-image /Restorehealth” It may take several minutes to complete, but if there are corrupted files in your system, this tool can repair them.
Reset your shader cache.

If you’re using Nvidia, refresh your shader cache. Your PC’s cache system improves the performance and responsiveness of your games and lowers the amount of time that an image takes to render on the screen. However, when it becomes overloaded, it can cause your game to lag, drop frames, or crash. To clean out your Nvidia shader cache: Right-click the Windows desktop and click “Nvidia Control Panel.” If it doesn’t show up in the first menu, click “Show more settings.” Go to “3D Settings” and “Manage 3D Settings.” In the “Global Settings” box, scroll until you find the “Shader Cache” feature and click on the dropdown menu to switch it to “Off.” Restart your computer. Right-click on the Start button and go to “Shut down or sign out” > “Restart.” In the Nvidia GeForce Experience app, click on “Drivers,” click “Reinstall driver” under the dot menu in the upper right corner, then check the box that says “Perform a clean installation.” After the drivers are reinstalled, type “disk cleanup” in the search box on the desktop taskbar and select “Disk Cleanup” from the results. Select the OS “(C:)” drive and hit “Ok.” Click on the “DirectX Shader Cache” and then click “Clean up system files.” Hit “Ok.” Your shader cache will then be deleted and refreshed. Navigate back to the Nvidia Control Panel’s 3D Settings. Find the “Shader Cache” feature again and switch it back to “On.” Restart your computer once more. Right-click on the Start button and go to “Shut down or sign out” > “Restart.”
Use ethernet instead of Wi-Fi.
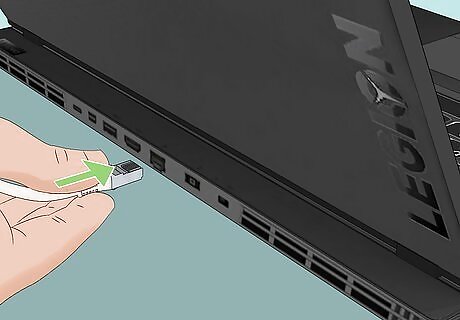
Using an ethernet cable can transfer data to your computer faster. Even if you have a high-speed Wi-Fi connection, you may experience connections that drop out. To prevent this and keep your game running smoothly, plug an ethernet cable from your router into your PC. On your computer screen: Click on the Start button, then type “control panel” and select the “Control Panel” app. Select “Network and Internet” > “Network and Sharing Center” > “Change adapter settings.” Right-click on the “Ethernet” icon and click “Enable.” If your internet connection doesn’t turn on, right-click the “Ethernet” icon, click on “Properties,” and check the “Internet Protocol Version 4 (TCP/IPv4)” box. Click “Ok.”
Change network DNS settings.
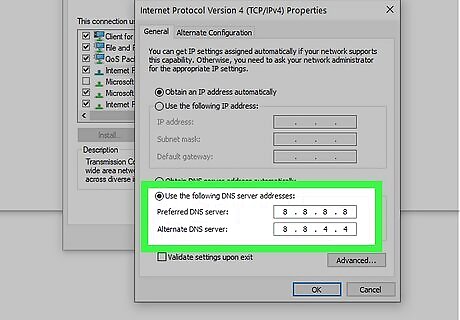
Choose a different DNS server. Often, your computer will be preset to your internet provider’s Domain Name System (DNS), which may cause you to experience lag when gaming. To change the DNS, go to Settings, and click “Network & Internet.” Select “Properties,” and where it says “DNS server assignment,” click “Edit.” From the dropdown, select “Manual” and turn on “IPv4.” Then, enter a server in the two boxes. Here are free DNS servers so you can see which one works best for you: Google: Preferred DNS Server: “8.8.8.8” Alternate DNS Server: “8.8.4.4” Cloudflare: Preferred DNS Server: “1.1.1.1” Alternate DNS Server: “1.0.0.1” OpenDNS: Preferred DNS Server: “208.67.222.222” Alternate DNS Server: “208.67.220.220” Comodo Secure DNS: Preferred DNS Server: “8.26.56.26” Alternate DNS Server: “8.20.247.20” Level3: Favored DNS Server: “209.244.0.3” Exchange DNS Server: “209.244.0.4” Quad9: Preferred DNS Server: “9.9.9.9” Alternate DNS Server: “9.9.9.9”
Update your graphics drivers.

Updating your graphics drivers can improve your PC’s performance. Nvidia and AMD both frequently release new graphics drivers which can majorly improve your computer’s ability to process gaming, especially newer video games with higher graphics. To update your graphics drivers: Identify what graphics card your PC has. Hit the Start button, type “System Information” into the search bar, then hit Enter. On the left side, go to “Display” and look for your graphics adapter model in “Adapter Type” or “Adapter Description.” You should see either Nvidia, Intel, or AMD. If you see both Intel and Nvidia, update your Nvidia drivers to boost your gaming performance. Download the correct drivers from Nvidia, AMD, or Intel. Select the exact model of your graphics card, which can be seen in the Device Manager window. If you have an Nvidia adapter, you can also use GeForce Experience which can update your drivers automatically.
Defragment or TRIM your drive.

Defrag or optimize your hard drive to increase its speed. Over time, your hard drive can become slower as more files pile up. To optimize your drive and increase the speed of your video games, use Windows 11’s built-in optimization tool: Open the Start Menu, type “defragment,” and select “Defragment and Optimize Drives.” Select the drive you want to optimize. You can select one of your drives listed and click “Analyze” to check and see if it needs optimizing. Click “Optimize.” This may take a while. If you’re defragmenting an external drive, make sure it stays plugged into your PC until the process is completed. TRIM should be enabled by default, but if it gets accidentally switched off, search “command” in the Start search bar and open “Command Prompt.” Enter the command “Fsutil behavior query disabledeletenotify” into the box and hit Enter. If TRIM is enabled, the response will be “= 0.” If you do not receive this response, enter the command “fsutil behavior set DisableDeleteNotify 0” If you receive the same response, you may need to update your firmware.
Optimize the Windows Registry.
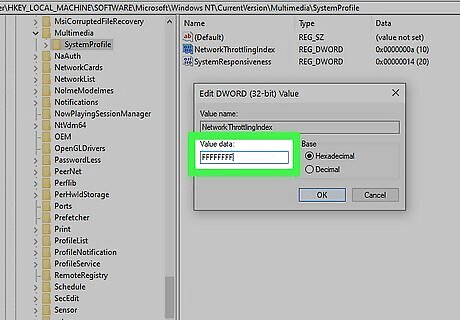
To prioritize gaming on your PC, change a few values in the registry. This step will tweak a couple of important Windows Registry keys so that your PC and its CPU resources will prioritize gaming above other programs. To optimize the registry: Type “Run” into the Windows search bar and press Enter. In the search box, type in “regedit” and select “Ok.” Double-click “HKEY_LOCAL_MACHINE,” double-click “SOFTWARE,” then find and double-click the “Microsoft” folder. Scroll until you find the “Windows NT” folder and double-click it. Double-click the “CurrentVersion” folder, and double-click the “Multimedia” folder. Select the “SystemProfile” folder. Double-click on the “NetworkThrottlingIndex” property and delete any value from the “Value data” box. Type in “FFFFFFFF” and hit “Ok.” This will disable Network Throttling, which helps your internet speed. Double-click on the “SystemResponsiveness” property and change the value in the “Value data” box to “0” to ensure all your CPU resources go towards gaming. Click “Ok.” In the left menu, double-click on the “SystemProfile” file under “Multimedia.” Double-click on the “Tasks” folder, then select the “Games” folder. Double-click on “GPU Priority,” set the “Value data” to “8” and click “Ok.” Double-click on “Priority,” change the “Value data” to “6” and click “Ok.” Double-click on “Scheduling Category,” change the “Value data” to “High” and click “Ok.”
Disable Superfetch and Prefetch.

Disable Superfetch and Prefetch on your PC. Disabling Superfetch and Prefetch can improve your CPU’s performance, free up space from your SSD, and make your preferred game run smoother. Here’s how to do it: Select Start and type "regedit" into the search box. Double-click on “HKEY_LOCAL_MACHINE” > “SYSTEM” > “CurrentControlSet” > “Control” > “SessionManager” > “Memory Management” > “PrefetchParameters.” Right-click on EnablePrefetcher and select “Modify.” This will present you with a window with given values. Change the “Value data” to 0. Repeat the same steps with EnableSuperfetch. Restart your computer. Prefetch and Superfetch should now be disabled.
Overclock your Graphics Card.
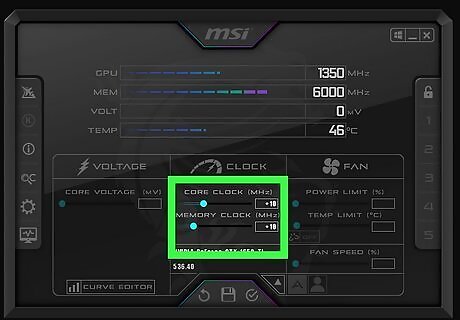
Before upgrading your GPU, try overclocking your graphics card. If you experience low FPS, it may be because your GPU (Graphics Processing Unit) is struggling. Although it can significantly improve your gaming experience, overclocking beyond the factory setting could potentially damage your graphics card. Download free benchmarking and analytics software. The most popular options are Unigine Superposition or Unigine Heaven. Run the benchmark and choose the “1080p” option from the “Preset” menu. Disable “Vsync” to keep your frame rate not locked to your monitor’s refresh rate. Click “Run.” This will prompt the benchmarker to play through a series of scenes that are designed to test the capability of your device's performance. Once the test is complete, a window will appear with your graphics card's score. Write down the minimum, maximum, and average frame rates. Keep an eye on your temperature as the benchmark runs, and ensure your fans are turned on to 100%. Download a GPU tweaking tool for free online—one of the more popular versions is MSI Afterburner. Open the software and push the “Power Limit” slider all the way up. Set the “Temperature Limit” slider a little lower than the maximum. Raise the core clock by 5 to 10 MHz and click “Apply.” Run Superposition again. Keep an eye on the temperature as you do so to avoid frying your hardware. Repeat this process until the benchmark fails. You can tell that your benchmark has failed if it crashes or if you start to see black glitches, blotches, or bright stars on the screen. When this happens, reboot your PC. Set your GPU to the last stable clock speed. Open Unigine Heaven and set your graphics settings, then hit “Run” to begin a stress test. Let it run for a few hours, checking occasionally to make sure the temperature doesn’t get too high or you start to see glitches. If it does crash, dial back your clocks to make sure they’re stable. Play through a graphics-intensive game to make sure you’ve found the right frequency and see how it runs.
Upgrade Your Hardware.

Upgrade your SSD or RAM. Using your Solid-State Disk (SSD) for the main drive can decrease your loading times and make your computer faster overall. Adding more RAM can also speed up your system and create a dramatic increase in performance. Here are tips for what to look for when you’re shopping for new hardware: Choose an SSD with at least 500 GB. You can usually pick up a 1TB drive for a little more than $100. Many new video games require at least 80 GB in total. Go to “System Information” in the Start menu to identify what kind of motherboard and CPU you have, which can give you an idea for what kind of memory is supported by your system. This can tell you how much RAM you may need. If you have tried all of the above methods and still do not experience improved gameplay, it may be time to upgrade your PC.


Comments
0 comment