
Assembling the Drum Set
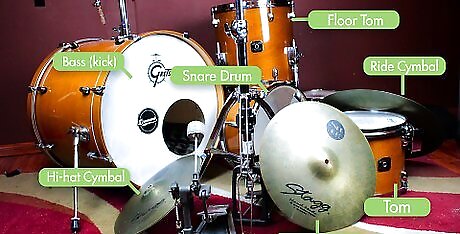
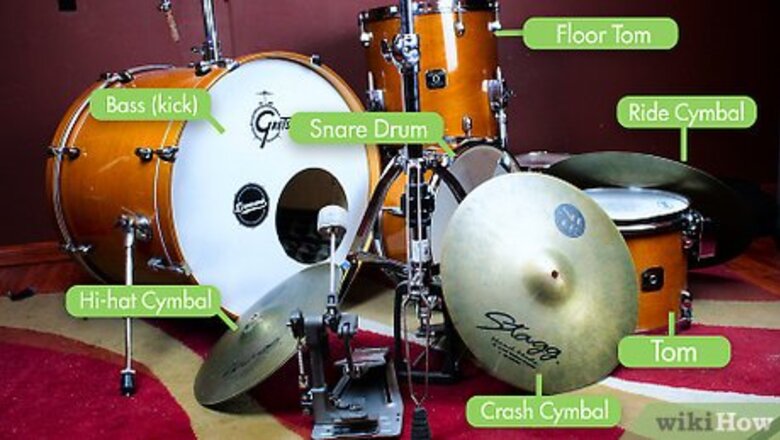
Gather all the necessary pieces for your drum set. In addition to the drums and cymbals themselves, make sure you have a small but important tool called a drum key handy. This tool is used to tighten and loosen some of the smaller bolts in the drum kit and is essential if you ever need to disassemble one of the drums (like if you need to replace a head). For a standard-size drum kit, your kit will probably include most, if not all, of the following drum pieces: Snare drum Bass (kick) drum (with pedal) Hi-hat cymbal (with pedal) Crash cymbal (with stand) Ride cymbal (with stand) Toms and/or a floor tom Throne (the stool you sit on)

Position your bass drum centrally first. Set the bass drum on the floor vertically so that the outer head (which usually contains a logo or the brand name) faces away from where you intend to sit. From this, you'll build up the rest of the drum set.
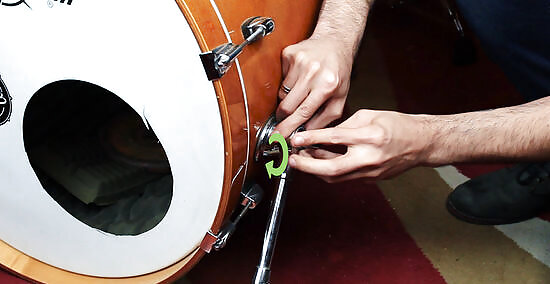
Install the bass drum's legs. Grab the two metal legs that attach to the bass drum and slip them into the holes on either side of the drum. Tighten the brackets that hold them in place by turning the knobs. Adjust the legs so they reach all the way to the ground, lift the drum slightly off the ground to accommodate the pedal, and are angled slightly forward so that they can support most of the drum's weight as you press on the foot pedal. Some drum sets come with pre-attached legs that you must loosen, drop to the floor, and then tighten. Some bass drum legs will have spikes on the tips and others will have rubber “feet.” For carpeted floors, you can use either. Avoid using spiked legs on a hard surface like wood flooring as these can leave gouges and marks.
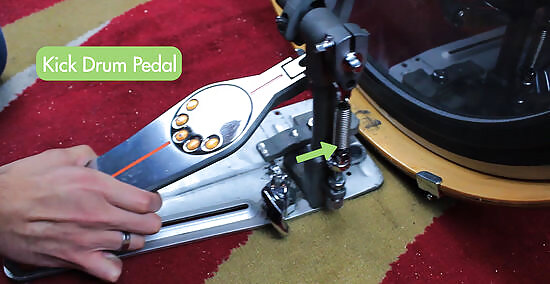
Install the kick drum pedal at the back base of the bass drum. Usually, the foot pedal you use to play the kick drum is secured to the bottom edge of the bass drum with a screw-on bracket. Slip the bottom edge of the foot pedal assembly under the bottom center of the bass drum, then tighten the upper part of the pedal assembly by turning its screw. The pedal should clamp onto the bottom edge of the bass drum, holding itself in place. Other pedal configurations (like double bass pedals) will have more complex assembly processes. Consult any instructions included with your pedals for more information.
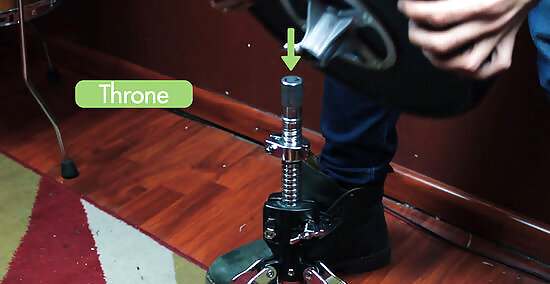
Place your throne behind the bass drum and adjust it to the proper height. Use the knob or lever underneath the cushion of your throne to make the throne taller or shorter. Test different heights by sitting on the throne and giving your kick drum a few hits with the pedal. This should feel comfortable and easy. Most drummers play with their knees bent at approximately a 90-degree angle. Posture tip: Position the throne high and far enough back that your thighs gently slope downward and your foot falls naturally on the bass drum pedal. Almost any throne height is fine if it allows you to play easily and hit the kick drum without pushing it forward.
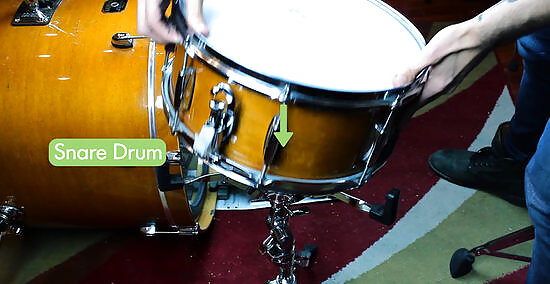
Assemble the snare drum in its stand. The snare drum usually sits in a short stand with three adjustable horizontal arms that hold it in place. The ends of these arms are usually rubberized to keep the snare from moving while you play it. The stand itself is fairly easy to set up; simply spread the legs at the bottom so that the stand stays upright and use the mechanism at the top to lift and adjust the angles of the arms. Posture tip: The snare should sit securely in the stand's arms at a roughly horizontal angle. Most drummers prefer their arm bent at a 90- to 110-degree angle when their stick strikes the center of the drum. Any angle that’s comfortable for you is valid. For instance, Daru Jones, a drummer who has toured with artists including Jack White, plays his drums in an unconventional arrangement, with some of his drums slanted downward toward the floor.
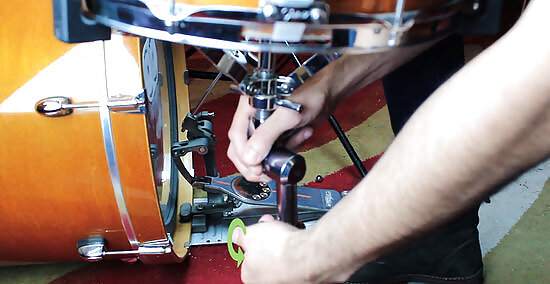
Adjust the snare to a good height in front and to the left of the bass. Loosen the main nut on the snare stand to adjust its height via the telescoping central column. You'll want your snare at a level that allows you to play it without hitting your legs while sitting up straight and comfortably. This is usually about 2 in (5.1 cm) higher than the tops of your knees. For most rock-style playing, you'll want the snare to sit in front of and slightly to the left of the kick drum so that you can hit it with the left hand stick (assuming a right-handed setup) with the stick nearly flat. This allows for a good crack and the ability to make a 'rim-shot' hit as needed.
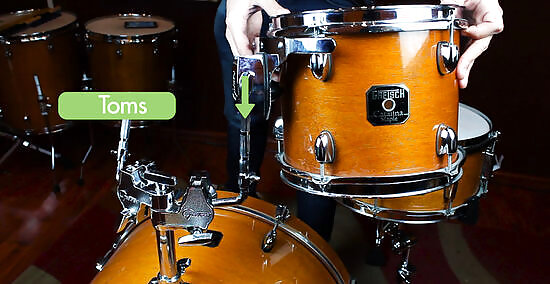
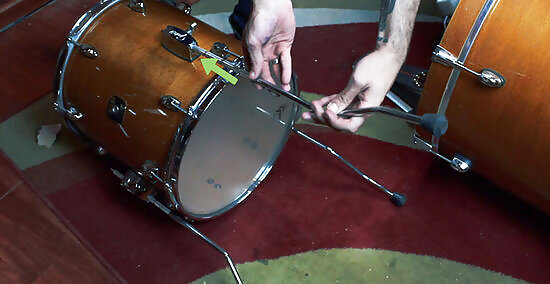
Mount the toms on top of the bass drum. Most bass drums include a metal bracket on top that will allow you to mount two toms in a way similar to how you mounted the bass drum's legs. Usually, there will be two separate holes on top of the bass drum—one for each tom's metal mounting pole. Sometimes there may only be one hole, in which case you'll have to mount both toms on one central pole. The precise positioning of the toms is a personal preference. Make sure they’re positioned close enough and at a proper angle to allow quick switching between toms when seated (usually this means you'll want the heads angled towards you and slightly towards each other). Some players prefer to mount their toms on cymbal stands or other stands rather than on top of the bass drum. Note that the precise way that the toms attach may differ between drum brands, so check any included factory set-up instructions if you are unsure of how to proceed.
Attach the floor tom's legs and position it to the right of the bass drum. Most floor toms have long, thin metal legs with rubber feet and a small bend so that the feet are offset from the edges of the drum. Loosen the knobs on the side of the floor tom and insert the legs (feet facing down). Tighten the nuts so that the drum sits slightly above the feet and is well-balanced. Sit in the throne and give the floor tom a few good hits to ensure it won't move while you play it. Usually, assuming a right-handed set up, the floor tom sits in front of and to the right of the bass drum so that it can be comfortably hit with the right hand.
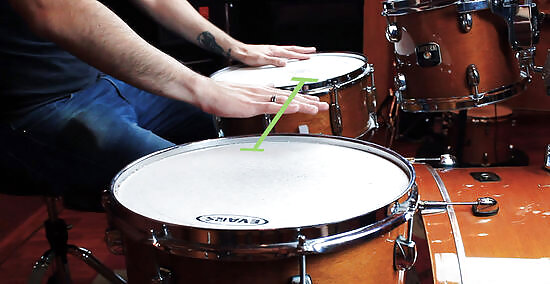
Make the height of the floor tom equal to or close to that of the snare. You'll want to be able to to hit your floor tom without any unnecessary effort, so adjust its legs until it's roughly horizontal and roughly at the level of your snare drum. Of course, as mentioned above, if an alternate positioning makes it easier for you to play, feel free to use it.
Adding the Cymbals
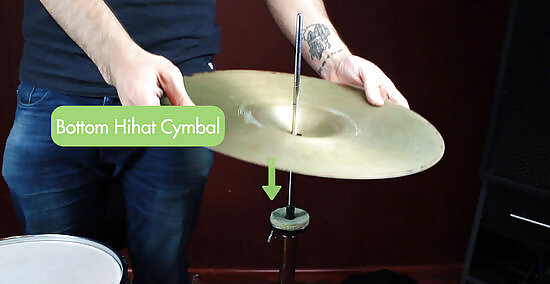
Unfold the hi-hat stand and add the bottom cymbal. The hi hat stand is a straight, medium-height one that usually has an attached pedal and three legs at the bottom. Spread the legs out to give the hi-hat a wide base of support. Then, slide the bottom hi-hat cymbal on top of the hi-hat stand so that the “cupped” side points up. Usually, this means you'll have to thread the narrow top part of the high hat stand through the hole in the center of the cymbal. This cymbal just sits in its place (it does not screw into anything). If you're having trouble telling the difference between the top and bottom hi-hat cymbals, the top cymbal will usually bear the name or logo of the manufacturer, while the bottom one will be unmarked. Often, the two cymbals are constructed nearly identically, so you may not even need to worry.
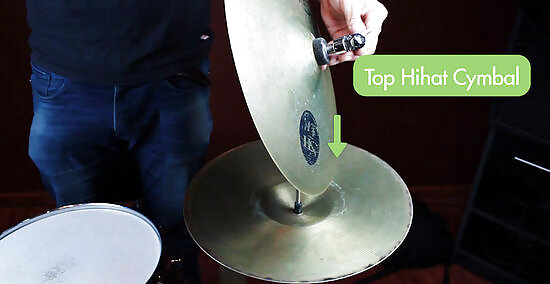
Install the top hi-hat cymbal and place the stand to the left of the snare. Unscrew the bottom nut on the hi-hat clutch (this is what holds the top hi-hat cymbal to the hi-hat stand). Place the top hi-hat cymbal between the 2 felt pads inside the hi-hat clutch. Screw the nut back on the bottom and put the hi-hat clutch onto the hi-hat stand. Test the hi-hat by hitting while pressing the pedal. It should produce a thin “click” when the pedal is pressed down and a loud “hiss” when the pedal isn't pressed down. Usually, the hi-hat sits to the left of the snare so that it can be hit with the right hand stick (which “crosses over” the left hand stick on the snare). The pedal is usually pressed with the left foot. Posture tip: Position the hi-hat pedal so that it sits where your (usually left) foot lands naturally. Consider sitting so the bass drum and hi-hat pedals for a “V” shape that mimics the natural positions of both feet.
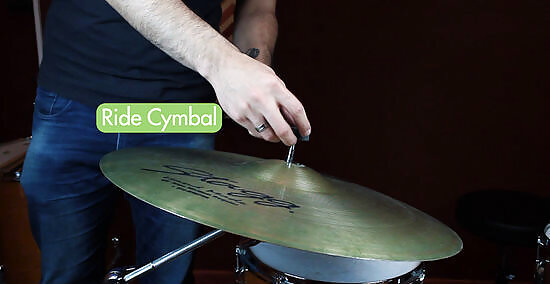
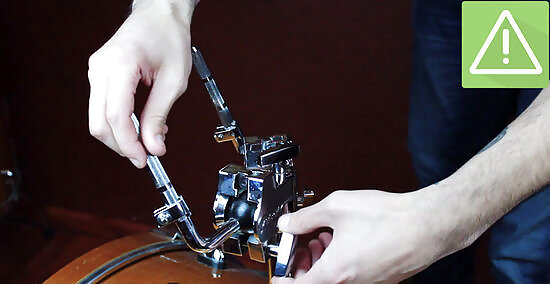
Install the ride cymbal on its stand and place it on the right side of the kit. Usually, the ride cymbal comes with a stand that has a curved base with three supporting legs and an upper portion that stands at an angle. Spread the legs to support the stand, then unscrew the nut at the top of the stand and position the ride cymbal between the two felt pads. Re-tighten the nut, but not too tight—the cymbal should be allowed to “swing” if it's hit hard. Finally, tighten the knob and adjust the height of the cymbal to a comfortable level. Generally, the ride cymbal is positioned on the right side of the drum kit, over and behind the floor tom and the bass drum. The cymbal itself usually hangs over the floor tom somewhat, though not enough to impede access to the drum.
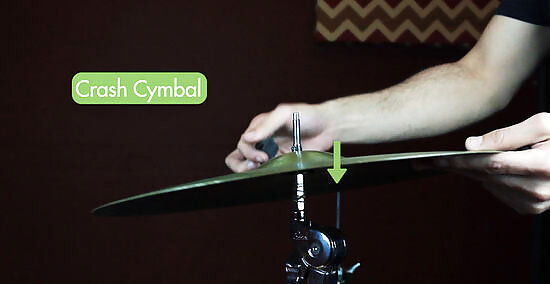
Install the crash cymbal on the left side of the kit. Most standard drum kits also come with at least one crash cymbal. The stand for this cymbal may have an adjustable arm like that of the ride cymbal or may simply sit straight up and down. Regardless, the crash cymbal is installed in basically the same way as the ride. Again, don't re-tightening the nut too tightly—it's important for cymbals to be able to move fairly freely. The crash usually is positioned on the left side of the drum kit, over and behind the bass drum and hi-hat. Any additional cymbals are usually spaced around the sides and back of the kick drum.
Testing the Drum Set & Making Adjustments
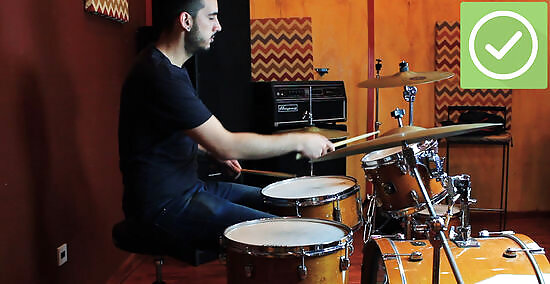
Test your drum kit out with proper posture to check if everything’s comfortable. Give it a quick test to ensure that all the pieces are properly positioned and in working order. Make sure that you can reach every piece of the kit without straining so you can perform fills without difficulty. If something feels off, adjust the drum angle or position until it feels natural. For good playing posture: Sit with your lower back positioned above your hips and the rest of your back straight but relaxed. Keep your shoulders held back and loose. Push your throne back and adjust the height so your thighs slope slightly downward. Your feet should land naturally on the bass drum and hi-hat pedals. Your arms should not feel strained or like you’re reaching incredibly far when you hit any drum or cymbal. Generally, they should stay close to your body with your elbows tucked in (unless you’re reaching for a far cymbal or crossing your body).
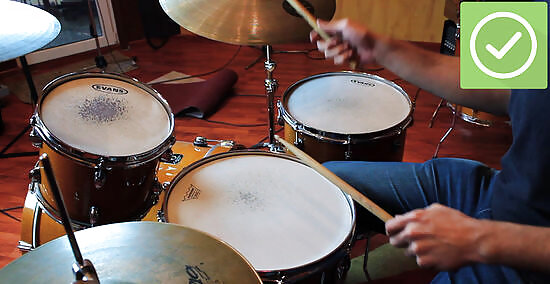
Check the height and angle of your drums with your preferred stick grip. How you hold your sticks affects your technique, stamina, and the sound you get from the drums. If the angle or height of your snare, toms, or cymbals causes your grip to feel unnatural when you strike them near their centers, adjust them so both your grip and elbow angles are comfortable. The main grips include: Unmatched (traditional) grip: Your right hand holds the stick overhand and your left hand holds it underhand (common for marching band and jazz drummers). Matched grip: Both drumsticks are held overhand. The 3 types of matched grips include: French: The palms of your hands face each other and your stick control is largely in your fingers (good for precision and control). German: The palms of your hands face down toward the drum (good for power). American: A middle ground between the French and German grips where your palms are angled at about 45 degrees compared to the drum head.
Adjust and accessorize your set in any way that works for you. Being a good drummer involves creating your own style. All of the greats play their own way and have their kits set up differently. Always feel free to experiment with what you have. If you can make your setup work and it’s comfortable for you, then you can go with it! Some drummers like to customize their setup with additional drums and accessories. Below are just a few common options you may consider as you advance: Setting up a double bass pedal Adding cowbells or jam blocks Mounting additional toms (sometimes tuned to specific notes) Placing chimes, bells, and other auxiliary percussion instruments nearby
More Drum Setup Considerations
Set up in an area with enough room to play comfortably. You'll want an area with enough room that you can set up your drum without crowding the pieces together. When you play, you should be able to make fluid, natural movements. Positioning your pieces too close together can make playing somewhat difficult and can even negatively impact your sound (like, for instance, if a cymbal bangs into an adjacent drum when it's struck). A standard 5-piece drum set usually fits nicely into an area that’s about 5 ft (1.5 m) wide and 4 ft (1.2 m) deep. Drum sets with different numbers of pieces will take up different amounts of space. A good rule of thumb is that if you can lay on the ground spread-eagle without touching anything, the area is big enough for your kit.
Perform any necessary maintenance on your equipment before you set up. Give your pieces a quick once-over to look for any problems that may require maintenance. If you spot anything that's out of order, address these problems before putting everything together. Disassembling your entire drum kit to perform maintenance on some small part can be a tremendous pain. Here are a few common issues to look for: Worn-out drum heads that need to be replaced Squeaky kick drum pedals “Bald” rubber support feet Dust and grime buildup from normal use


Comments
0 comment