
X
Expert Source
Jenny TranProfessional Hair Stylist
Expert Interview. 31 August 2020.
If you're thinking about going for an undercut, you need a pair of hair clippers with adjustable blades. For beginners, it's best to start with a small, subtle undercut and see how you like it before progressing to a bolder cut.
Choosing the Style Details
Inspect your hair's texture. Before going for an undercut, it’s important to consider your hair’s texture. An undercut removes some of the weight and body from your hair so it’s an ideal option for thick, coarse hair that can sometimes get too puffy. If you have fine or thin hair, you may want to reconsider choosing an undercut. It can actually make your hair appear thinner and take away the body. An undercut can be a good style for big, curly hair because it can take out some of the bulk.
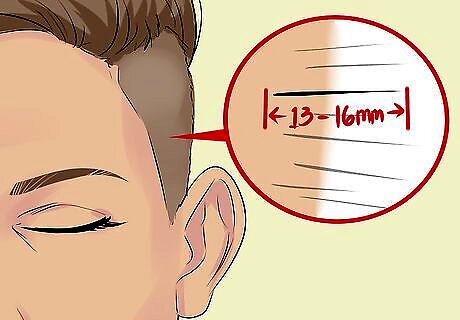
Decide how deep your want the undercut to be. An undercut can be as subtle or as deep as you like, depending on how short you cut the hair. Take the length of the rest of your hair into account. The shorter that your hair is overall, the shorter you can go with the undercut without creating too big a contrast. With long hair, you may want to keep the undercut a little longer for a more subtle look. If you want to ease your way into an undercut, keep it at 13- to 16-mm. For a bolder undercut, go for 6- to 10-mm. When you’re trying an undercut for the first time, it’s best to go for a longer cut. You can always go shorter, but you’ll have to wait for your hair to grow out if you cut it too short to begin with.
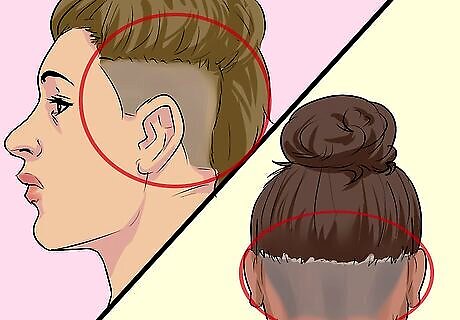
Determine how large an area you want to undercut. In addition to the length or depth, the size of your undercut also determines how dramatic your look will be. If you’re getting your first undercut, it’s best to keep the area that you cut fairly small. However, if you want a bold look, you may want to use a larger area for the undercut so more of it peeks out. In general, most undercuts involve the nape area of the head. The line of your natural part serves as the border. This type of undercut is usually only visible if you pull your hair up unless your overall haircut is very short. For the most dramatic undercut, you can cut the two bottom sections or even leave just the top section out and cut all of the lower layers. Keep in mind that if you do drastic undercuts like these, your shorn hair will be visible most of the time.
Sectioning and Parting Your Hair
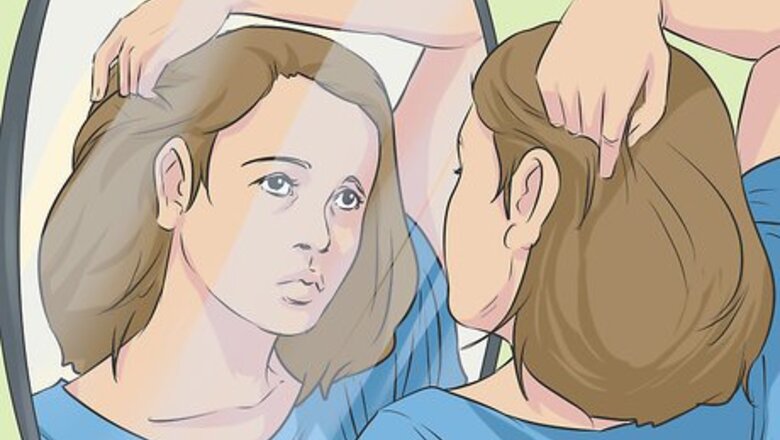
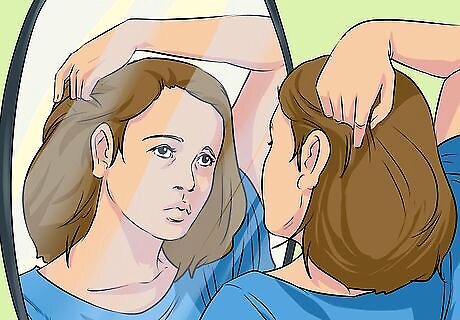
Set up in front of a large mirror. If you're doing the undercut to yourself, you're going to need to be able to see the back of your head so you know where you're cutting. Sit down in front of a large wall-mounted mirror to do the cut and have a medium-sized hand mirror available that you can hold up to the back of your head so you can see it in the wall mirror.
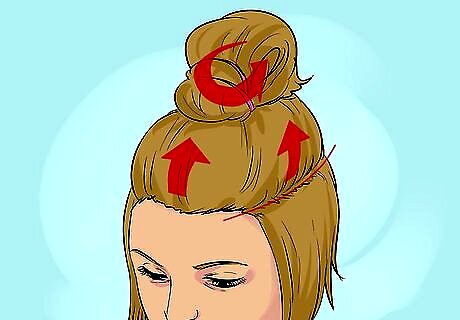
Pull up the top section(s) of your hair. To get ready for the haircut, you want to pull all of the hair that you aren’t cutting out of the way. Run your thumbs behind your ears to lift up the top sections of your hair, twist it to create a single rope of hair, and secure it with a clip so only the area of hair that you plan to cut is left down. Make sure that there are no stray hairs from the upper sections of your hair that have fallen loose. You may accidentally wind up cutting them, and your undercut will turn out uneven.
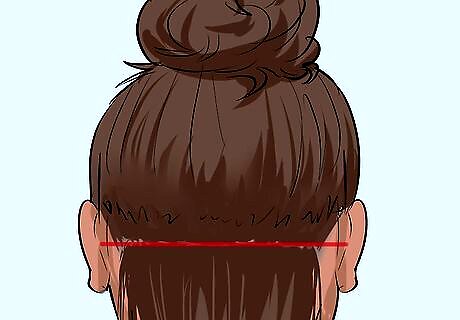
Create a straight part above the nape of your neck where you plan to cut. For the neatest looking undercut, you want to make sure that the part between it and the rest of your hair is as straight as possible. Use the end of a teasing comb to trace along the natural part and lift out any small piece of hair that should be part of the upper sections of your hair. You don’t necessarily have to use a straight part for the top of the undercut. For example, you may prefer a zigzag pattern to add more flair to your cut. However, you’ll want to start with the straight part and use the clippers to cut the design into your hair.
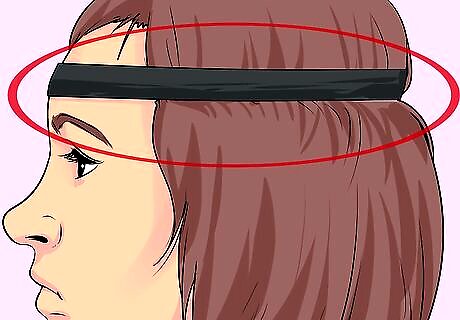
Place a headband at the part to serve as a guide. Once you’ve secured the top sections of your hair out of the way and ensured that your part is straight, you’ll still want to have a guide when you begin cutting. Place a headband right along the bottom edge of the top sections of your hair. That will block off the section of hair that you are cutting so you don’t cut any hair that you shouldn’t. Any type of headband that will stay in place on the back of your head without you having to hold it will work fine.
Cutting and Shaving the Hair
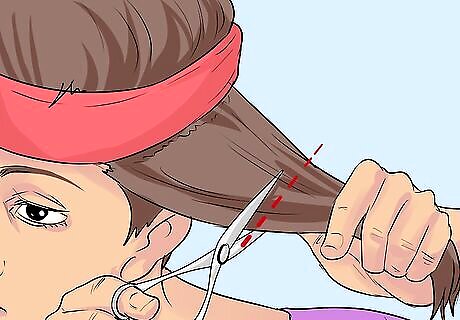
Cut the major length off. If your hair is fairly long in the back, it can be difficult to take all of the necessary hair for the undercut off with your clippers. Instead, use a pair of hair-cutting shears to cut off the major length from the designated area so you can just go with the clippers to buzz off the rest. Don’t wet your hair before you cut it. It’s usually easier to do when it’s dry.
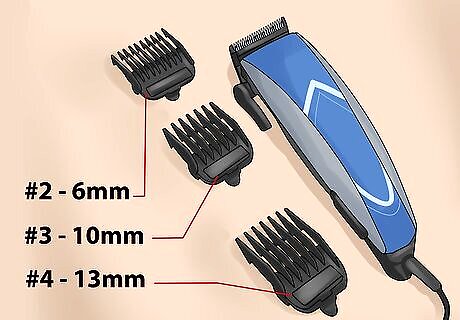
Place the appropriate blade on your hair clippers. Most clippers come with several different blades that allow you to control how short you clip your hair. Even if you’re going for a super short undercut, you may want to start with a blade that keeps your hair longer and then switch to a closer blade to finish off the look so you don’t take off more than you want. The grade 2 length blade cuts your hair to approximately 6-mm. The grade 3 length blade cuts your hair to approximately 10-mm. The grade 4 length blade cuts your hair to approximately 13-mm. The grade 5 length blade cuts your hair to approximately 16-mm. The grade 6 length blade cuts your hair to approximately 19-mm. The grade 7 length blade cuts your hair to approximately 22-mm. The grade 8 length blade cuts your hair to approximately 25-mm.
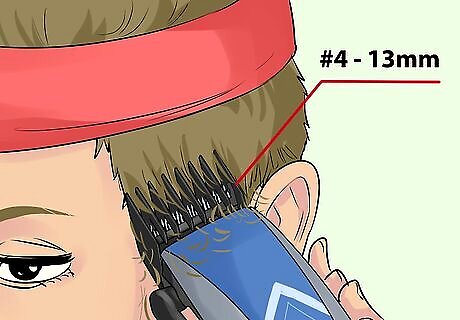
Trim the hair with the clippers to your desired length. Once you’ve chosen the appropriate blade for your clippers, run them over the section of hair that you want to cut in an upward direction to just below the headband to remove it. Move the clippers over the entire section once and then go back in to cut the hair shorter if necessary. It helps to keep your free hand braced on the headband so it stays in place and you don’t accidentally cut off more hair than you intend.
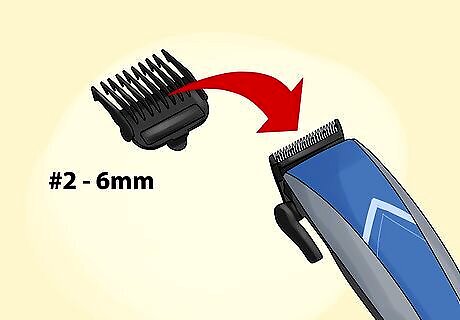
Switch to a shorter blade to finish the cut. After you’ve removed the bulk of your hair, you may find that it’s not quite as short as you’d like. Swap the blade on your clippers for the next smallest size, and go over the hair a second time to finish it off. Don’t panic if you wind up cutting your hair a little too short. It will grow in fairly quickly, and if you’ve only removed the lowest section of hair, it will be fairly subtle.


Comments
0 comment