

X
Research source
ATV’s,[2]
X
Research source
skateboards,[3]
X
Research source
archery bows,[4]
X
Research source
and several places in your car.[5]
X
Research source
The car bushings most commonly replaced by DIYers are located on the lower control arms that connect the car frame to the wheel spindles. Bad bushings here can lead to popping noises, irregular wear on your tires, and a shaky steering wheel. It’s relatively easy and cost-effective to replace these bushings by yourself -- with the right tools and techniques.
Removing the Control Arm

Put on your protective eyewear and gloves. Safety comes first when working on your car. Make sure your eyes and hands are protected from any sharp debris or rust that can come from worn parts.
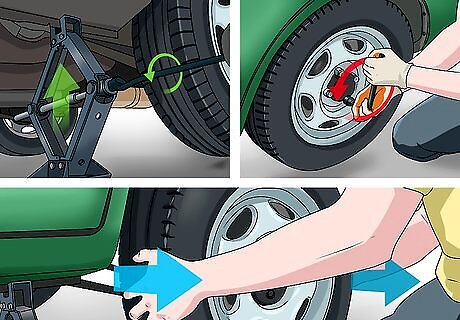
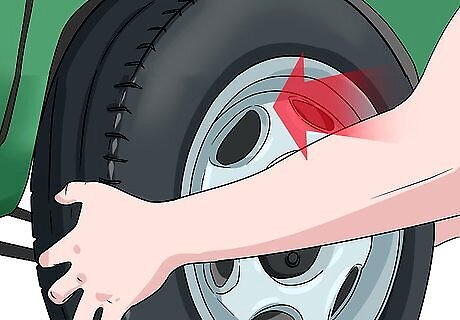
Remove the wheel. If you’ve never removed a wheel before, the easiest method is to use a jack to raise the car, then place the tire iron on the lug nut, turning it counter-clockwise until the lug nut comes off. Repeat this on all of the lug nuts, and then use both arms to pull the wheel toward you and off of the car.
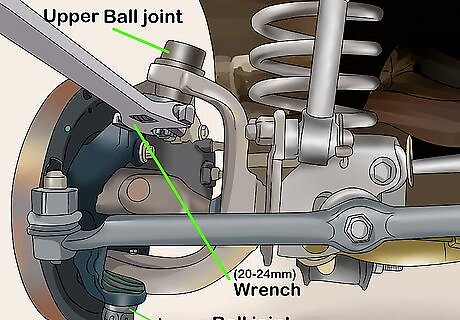
Locate the ball joint and release it using a large (20-24mm) wrench. The ball joint connects the control arm that you’ll be removing to the steering knuckle. It looks like a circular bearing in a socket, a bit like the joint of the human hip. Release the cotter pin and loosen the ball joint nut with the wrench. You can then use a hammer to strike the spindle and release the taper fit, disconnecting the ball joint completely.

Release the sway bar link using a 14-15mm wrench. This link connects the control arm containing the bushing to the sway bar, so you’ll need to remove it. Use the wrench to loosen and remove the link completely. You may also have to strike the connection with a hammer to release the taper fit, depending on what kind of car you have. If the link does not come off after loosening, try striking it with the hammer.
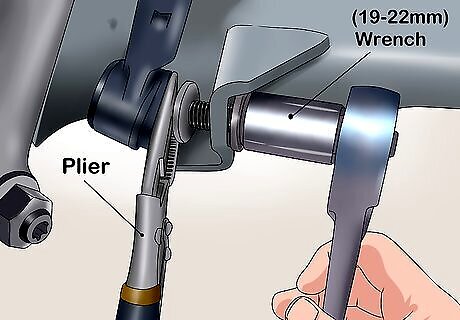
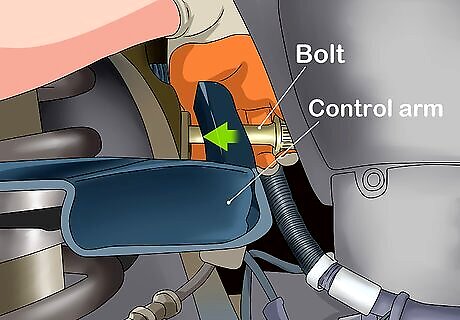
Use a 19-22mm wrench to loosen and remove the control mounting bolts. The bolts may have a nut on the opposite side which will need to be secured with another wrench before removal. Ensure the wrench is securely on the bolt before loosening to avoid rounding the bolt, as it will likely be very tight. After the bolts are removed, the arm joint will likely be less stable, so you should hold it in position as you are removing the second bolt.
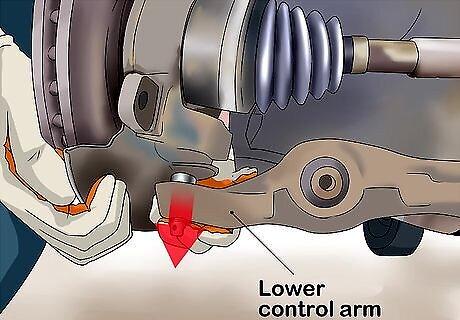
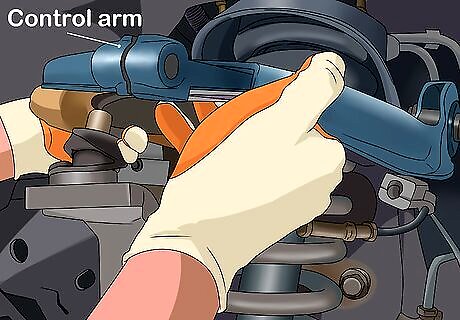
Pull on the lower control arm to remove it. If the arm is still in the mounts, pull it towards you while slightly wiggling it up and down to remove it completely and freely access the bushing.
Replacing the Bushing
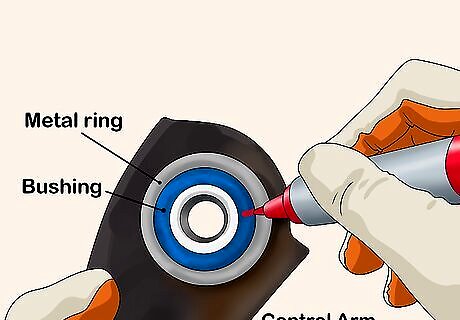
Mark the orientation of the bushing. The bushing will have two places where the rubber casing attaches to the outer metal ring. Mark these two places with a permanent marker on the control arm. This will help you replace the bushing in the right direction.
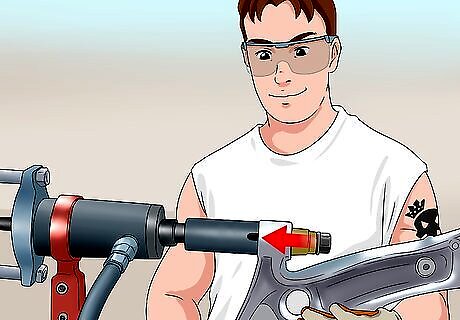
Remove the bushing with a hydraulic press. This is the easiest way to remove the bushing. Place the bushing part of the arm into the hydraulic press and activate the press. Listen closely, as there will be a popping noise as the bushing moves, and the arm will become loose when the bushing is completely out. Be careful not to damage the control arm by applying too much pressure with the press. Vic Widman Vic Widman, 4WD Specialist and Author When worn bushings lead to loose joints or vibration, replacement is key for performance and safety. Carefully remove the old bushing with a press or hammer, avoiding damage to the arm. Clean the area thoroughly before installing the new bushing with an alignment sleeve. Take care not to overtighten joints initially - snug is enough. Proper bushing replacement restores stability, ensures component longevity, and gets you back on the trails.
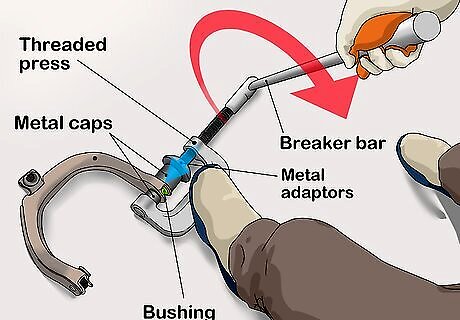
Use a threaded press to remove the bushing. This is a less effective method than a hydraulic press, but can still remove the bushing with some force. A ball joint press, or threaded press, will have a cup that matches the size of the bushing. Set up a driver that has the same diameter as the outer shell of the bushing, and use a wrench to operate the screw-jack to push the bushing out of the control arm.

Remove the bushing manually by striking it out with a hammer. This is the most difficult and least effective method for removing the bushing, but if you don’t have a hydraulic or threaded press it will work with some patience. Be careful not to hit the control arm, focusing each strike on the bushing until it flattens enough to be slid out. You will need a hydraulic press to install the new bushing, so you might be better off waiting until you have access to one.

Push out the excess rubber using a socket. You should be able to do this by hand without any problems. You’ll need to remove the rubber before you can install the new bushing. Use a socket that fits into the bushing, and push the rubber out. If the rubber is stuck, try separating it from the sides of the control arm using a flathead screwdriver.

Place the new bushing in the control arm. Make sure it’s facing the same direction as the previous bushing, using the flex part of the bushing as the point of reference. It might be a snug fit, so you will need to press a bit to get it into the control arm. Don’t apply lubrication to the bushing to get it into the arm, as this can cause it to slide out while in use.
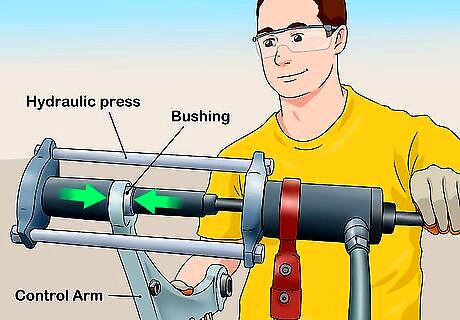
Use a hydraulic press to secure the new bushing. You will need access to a hydraulic press to replace the new bushing. Simply place the control arm on the press and activate it, making sure the arm stays in place to prevent it from misaligning the bushing.
Reinstalling the Control Arm
Slide the control arm back into the mounts. You may have to move the arm up and down while pushing. Be careful to align the bolt holes while you’re working.
Replace the bolts by hand. Place the bolts and tighten them slightly by hand, but not all the way, to avoid cross-threading. You will tighten them further with a wrench after you insert and tighten the ball joint.
Tighten the ball joint. Insert the bolt into the control arm and tighten the nut. You can then go back and tighten all of the rest of the control arm bolts completely.
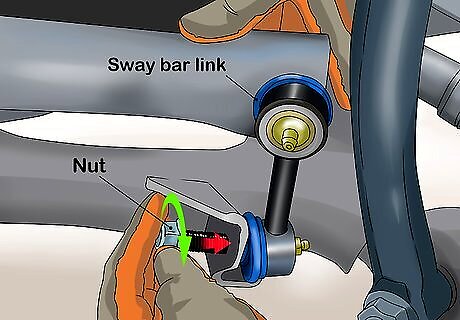
Reinstall the sway bar link and nut. Replace the sway bar link into the control arm and tighten the nut.

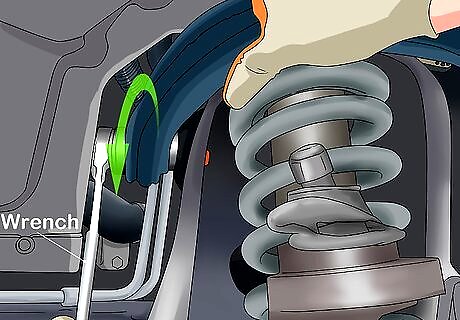
Insert and tighten the mounting bolt. Usually, there will be a specific torque that the manufacturer requires this bolt to be tightened to. This ranges from 66-75 foot pounds, and you should use a socket and extension to do this.
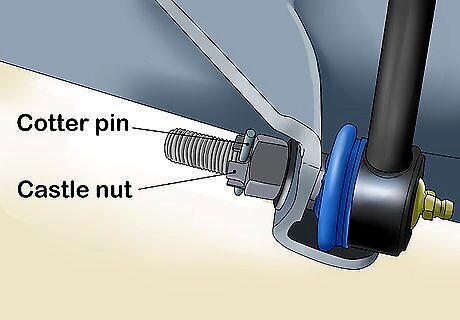
Replace the lower ball joint castle nut and cotter pin. Tighten the lower ball joint castle nut using the socket and extension. Reinsert the cotter pin into the holes aligned by the ball joint.
Reinstall the wheel onto the car. Place the wheel back up onto the control arms, and replace and tighten each of the lug nuts with a tire iron. When you can’t move the tire iron stops turning easily, the lug nuts are securely fastened.


Comments
0 comment